Note: This blog post has been written in 2010, and a lot has changed since then. I’m not using any of this anymore. The post is still available for posterity, but do take this into account when reading this.
Finally, I’ve made the move to a static blog engine! I’m using nanoc now (bye bye WordPress). nanoc is a very flexible and customizable static site generator, written by Denis Defreyne.
As with all static site generators, nanoc lets you write your source files in
a simple markup language. Out of the box, nanoc offers you the choice of using
Markdown, Textile, reStructuredText or plain HTML (with or without embedded
Ruby). In fact, nanoc is nothing more than a generator honoring a Rules-file
that tells it how to compile, layout and route the site’s items.
Compiling items 
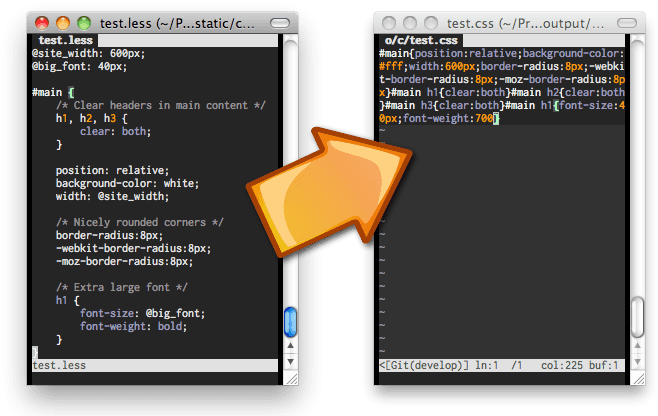
An “item” is a file on your website. It can be any kind of file, like a web site page (HTML), an image, a JavaScript or CSS file or an RSS feed. During the compile phase, you specify which sequential actions should be performed on the content of that item. These actions are called filters. Some examples of filters are an embedded ruby filter, a Textile-to-HTML converter, a less compiler, or minify CSS. Filters can be chained, for example:
compile '/static/css/*/' do
   # compress CSS :)
   filter :less
   filter :rainpress
end
Which turns .less-files into compressed CSS:

Any filter you can imagine, nanoc can handle. nanoc comes with a lot of filters out of the box, but even writing your own filters really is a piece of cake.
Routing items 
After compiling (i.e. transforming content through filters) comes the routing
of the items. This is a means of assigning file names to compiled content.
nanoc calculates default files names from the input, but you can use this to
influence the default naming. A special case is where you set the route to
Nil which doesn’t write the file at all. I use this to test draft posts
locally, like this (oh, did I mention the Rules file is 100% Ruby?):
route '/posts/*/' do
   if $include_drafts or @item[:published] then
      '/posts/' + @item.slug + '/index.html'
   end
end
Laying out items 
Finally, layouts are applied. Layouts are kind of templates that can be used to “frame” the item’s contents. This is typically used for HTML files only, but isn’t limited to it. For example, the blog posts are compiled into (partial) HTML, and the layout rules put the site’s container HTML around it, adding CSS styling, jQuery scripts, the header, sidebars and footer and Google Analytics tracking (these go for each page). There’s a special extra layout rule for blog post pages, which additionally adds Disqus comments.
Summary 
Each build of this blog also automatically:
- Converts Textile content to HTML
- Highlights syntax using pygments
- Converts less to CSS
- Minifies CSS
- Minifies JavaScript
- Downsizes source images
- Generates redirect pages for alternative (old-style) URL’s (for user that have existing bookmarks to old WordPress URL’s)
- Generates a new blog post RSS feed
In short, now nanoc is fully configured to my wishes, I can simply focus on writing blog content, without preparing image content (it is done automatically), and without having to choose between either a “WYSIWYG” editor or writing HTML manually. And I can do it in an offline fashion, too, which was one my main complaints about WordPress.
So I’m happy.
Oh, and since I have been converting my blog anyway, I also created a new look and feel for it. I hope you like it. Feel free to comment.